Blender Essentials of Edit Mode
For a quick reference, all these commands are listed in a cheat sheet.
There are two basic reactions to Blender. One is “Ooooh, Blender does so many amazing things!” and “Grrrr, Blender is such a confusing mess!”
I tried to learn Blender four times. The first three times, I had three days of just “Grrrr”, with no “Oooh!”
I’m going to pick out one little piece of Blender, and I’m going to describe a bunch of commands and their shortcuts. That’s 34 commands that you’re going to learn, and I realize that’s a lot of “Grrrr” I’m asking you to go through, but when we’re done, you’ll know enough to take a 3D object that only existed in your mind, and you’ll know how to set it up on a viewport. I think it’s your quickest route to your first bit of “Oooh!”
And why am I teaching you shortcuts? In my opinion, you switch between stuff way too much to not use shortcuts. With a word processor, I might hit the new file menu item and type, type, type for forty minutes. With an image editor, I might select a paint brush and draw for fifteen minutes before I pick the new layer.
In Blender, you have to change tools, modes and commands really frequently. You select, you extend, you move, you scale. These options are in the menus, but it’s not fun to be hunting through menus every three seconds, at least it wasn’t for me.
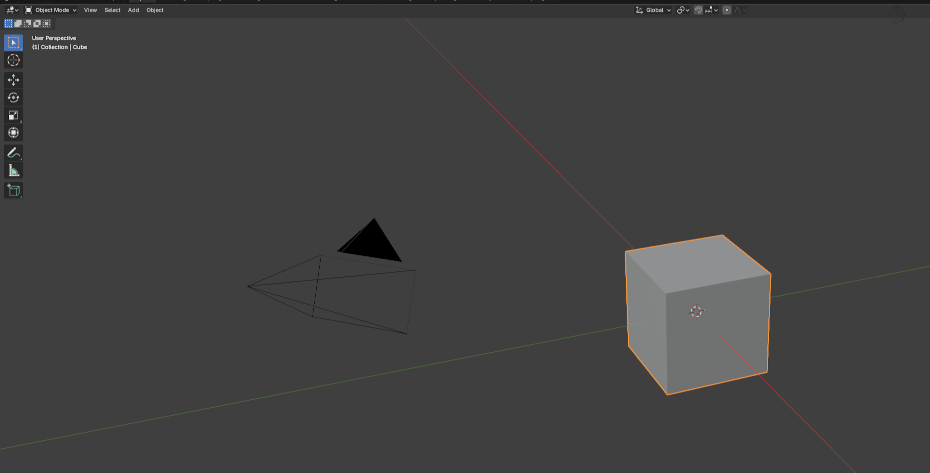
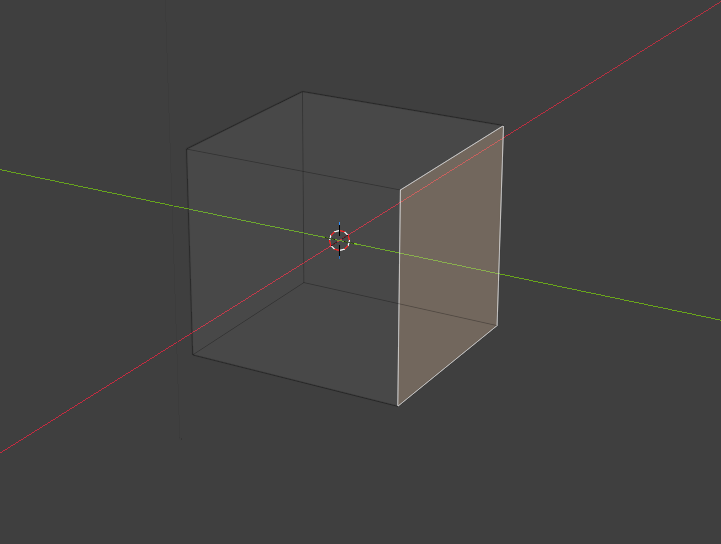
Let’s limit our scope. Blender has 22 windows. Fuck ‘em. Fuck ‘em in their stupid faces. We only care about one, the 3D Viewport. It looks like this:
This is where we start defining an object, and get, I hope, to your first bit of “Ooooh”.
Navigation
You’re in the 3D viewport. You’re looking at the cube. The first thing is how you move your perspective to see it from different angles.
Mouse Wheel
Blender loves the mouse wheel. Roll it in and roll it out, and you’ll zoom in and zoom out on that cube.
But wait, you can also push down the mouse wheel and move the mouse. Push it down like a button and go left-right-up-down and your perspective flips around.
Now push the mouse wheel down, hold shift and move the mouse around. Your perspective slides in whatever direction you go.
Menus
There are going to be a lot of keys to memorize. If you want to feel natural building stuff in Blender, there’s going to be a lot of muscle memory to build up. I recommend you practice making things and keep looking at the cheat sheet here as you go.
Here are the first two:
 Backtick brings up a perspective menu. Hit backtick, and you’ll bring up a
a set of eight choices. This lets you look from the top, the front, the left,
the nearest camera, etc. . . You can hit backtick and use the mouse or hit one
of the numbers. For instance `8 will switch your view to top down. If you hit
backtick and select Top (8), that does the same thing.
Backtick brings up a perspective menu. Hit backtick, and you’ll bring up a
a set of eight choices. This lets you look from the top, the front, the left,
the nearest camera, etc. . . You can hit backtick and use the mouse or hit one
of the numbers. For instance `8 will switch your view to top down. If you hit
backtick and select Top (8), that does the same thing.
 brings up the shading menu. You have four different ways of looking at objects
- wireframe Every object is see through. This is handy because Blender doesn’t let you select things you can’t see. If you’re in front of the object, going to wireframe view is the only way to see the back of the object without moving.
- solid Show every obect as though it’s solid made from the same light gray stuff. You start in this mode.
- material preview For the moment, put this firmly in the “fuck that” category. If you’re curious, this remembers what color and how shiny your object is, but kind of pretends everything is lit the same.
- rendered Also part of the”fuck that” category. This works out the material and lighting like it’s doing a final render.
Selecting
Here’s a couple more hotkeys. I know this is getting old. I’ll tell you one thing. You know how Blender has a million different windows? All those windows share a lot of hotkeys. So while you’re learning to make objects, you’re getting skills that will let you do other stuff down the line.
 selects whatever is under the mouse cursor. You probably know this one.
 with almost as well known. This keeps selecting whatever you had
before and also selects whatever you click on.
with almost as well known. This keeps selecting whatever you had
before and also selects whatever you click on.
 selects everything. Everything you can pick get selected.
 with selects nothing. It all gets unselected.
 deletes whatever is selected. It’ll ask you if you’re sure.
Edit Mode
The 3D Viewport has six modes. I wish we could tell them all to fuck off, but we need two of them. There’s object mode, where you pick out shapes, and there’s edit mode, where you’re modifying parts of an individual shape.
 moves you between the last couple modes. We will ignore sculpt, vertex, weight paint
and texture paint for the time being.
moves you between the last couple modes. We will ignore sculpt, vertex, weight paint
and texture paint for the time being.
When you go into edit mode, you lose the ability to affect anything but the object you selected in object mode.
Anatomy of a Mesh
A shape in Blender is called a “mesh”. It has three levels of components. The smallest one is a vertex. A vertex is a single, infinitely small point in space.
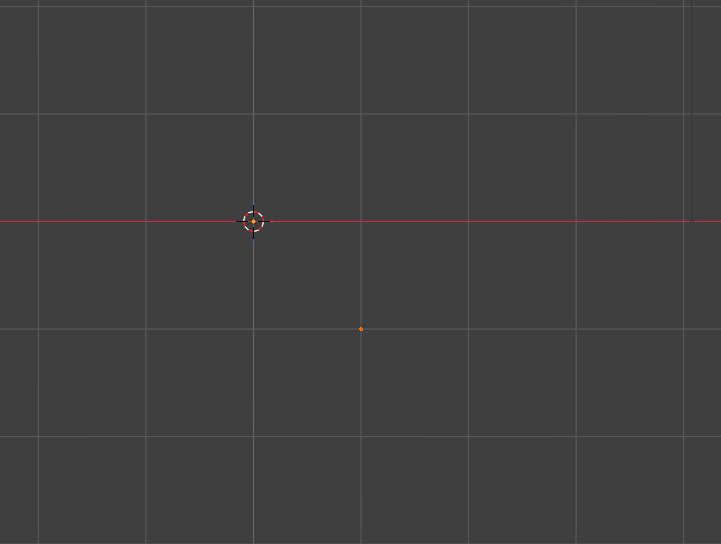
 hit while you are in edit mode, will tell Blender to select vertexes. I selected the
starting cube, hit tab to go into edit mode, hit 1 to select vertices, and I selected all
but one and deleted them. Now my cube is only one vertex. I pick a forward view with the
backtick menu, and it looks like this:
hit while you are in edit mode, will tell Blender to select vertexes. I selected the
starting cube, hit tab to go into edit mode, hit 1 to select vertices, and I selected all
but one and deleted them. Now my cube is only one vertex. I pick a forward view with the
backtick menu, and it looks like this:
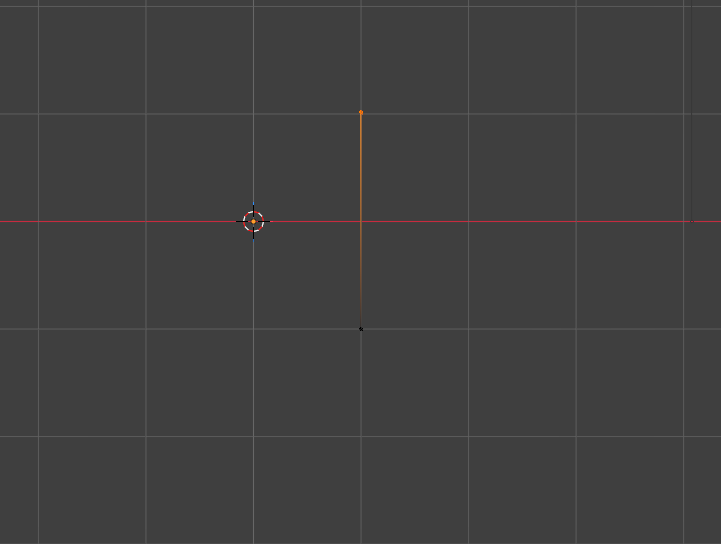
 for extend. In edit mode, this lets me extend the thing I have selected. I selected my
vertex, hit e, and moved the mouse up. Now I’ve got this:
for extend. In edit mode, this lets me extend the thing I have selected. I selected my
vertex, hit e, and moved the mouse up. Now I’ve got this:
So I have a second vertex joined to the first, like a strand of spider web. This is an edge.
 hit while in edit mode tells Blender to select edges. Each edge is a connection between
two vertices. I’m going to hit 2 and select this edge I just made.
hit while in edit mode tells Blender to select edges. Each edge is a connection between
two vertices. I’m going to hit 2 and select this edge I just made.
I can hit “e” again and extend that edge. I move the mouse left, and I have this:
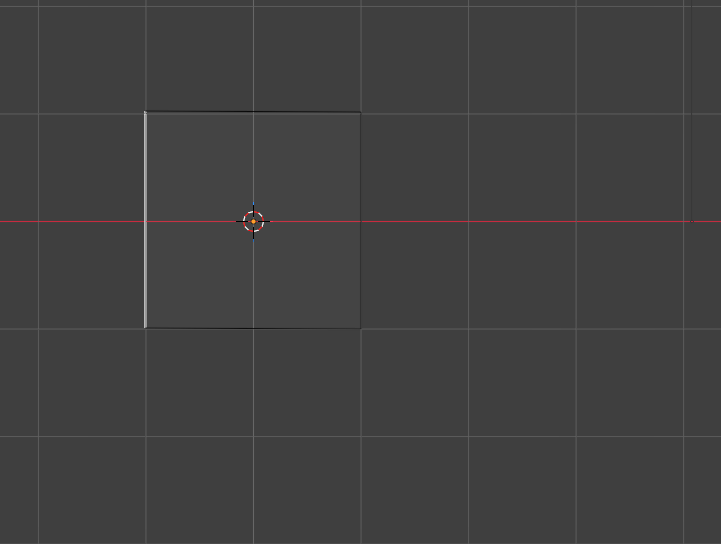
It’s a face. A face is a surface stretched between three or more lines like a soap bubble.
 hit while in edit mode tells Blender to select faces.
Can I hit this entire face and extend it? I can! Here’s what I get:
My face is extended to another face, and every edge created another face. I’ve turned this one face into a complete cube.
Selecting Revisited
All the selection tools I went over in object mode still apply in edit mode, only they affect vertices, edges or faces, depending what number you hit last.
Is still delete, but it is more complicated. In object mode, it’ll
ask if you really want to delete the things you selected. In edit mode,
it asks what things you mean:
If you say you want vertices deleted, it’ll get rid of every vertex that you’ve selected including all vertices belonging to any edge or face you’ve selected, and it’ll delete them all, as well as deleting every face or edge that touches them. It’s much more destructive than you might guess.
If you say you want edges deleted, it’ll get rid of every edge you have selected plus any face touching those edges.
If you say to delete faces, it leaves vertices and edges untouched.
If you hit “x” and choose a dissolve option instead of delete, Blender will try to stitch nearby edges and faces together as best it can.
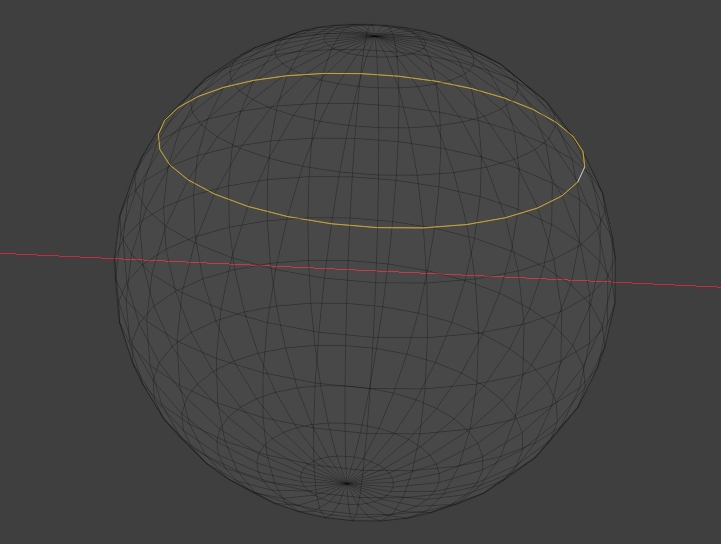
Edge Loops and Edge Rings
with If you’re in edge select in edit mode, this
selects an edge and any edge connected to it at less than a 90 degree
angle. So if you’ve got a sphere and you hit a horizontal line, you’ll
pick up an entire latitude, like this:
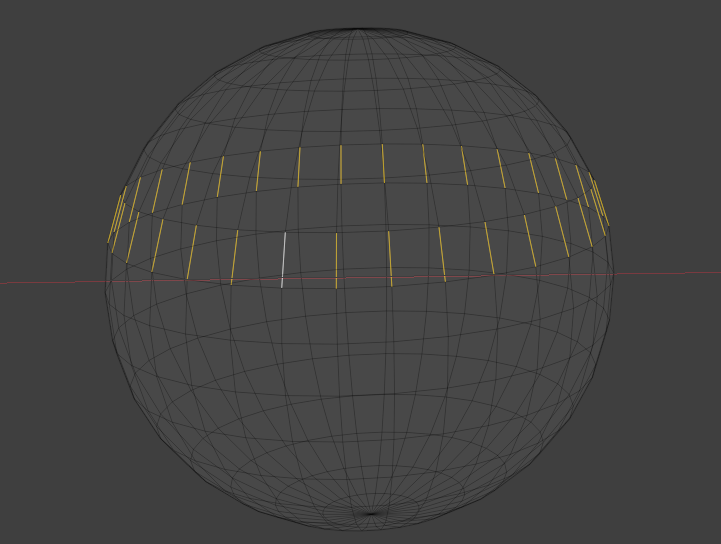
with both  and If you’re in edge select in
edit mode, this selects every edge roughly parallel to the one you
one you clicked on. It’s easier if you see it:
and If you’re in edge select in
edit mode, this selects every edge roughly parallel to the one you
one you clicked on. It’s easier if you see it:
Moving
This is pretty important. I wish I could have put it first, but if you can’t select things, you can’t move them.
 followed by
  Remember this as “go”. This will make the thing you selected go.
You can just hit “g” and move the mouse, and it will move the object
in the direction of the mouse relative to the direction you’re looking
at it.
Remember this as “go”. This will make the thing you selected go.
You can just hit “g” and move the mouse, and it will move the object
in the direction of the mouse relative to the direction you’re looking
at it.
So if you’re looking at an object face on, “g” and mouse up moves the object up. If you’re looking at the object from above, “g” and mouse up moves the object north because that’s up if you see something from above.
Since that’s really confusing, you can limit movement to a specific direction.
followed by ,  or followed by lets you move the selection in that one
direction. So if you hit “gx” and move the mouse, you can move the
selection east/west. “gy” and move the mouse, you can move the selection
north/south. “gz” and move the mouse, and the object moves up/down.
or followed by lets you move the selection in that one
direction. So if you hit “gx” and move the mouse, you can move the
selection east/west. “gy” and move the mouse, you can move the selection
north/south. “gz” and move the mouse, and the object moves up/down.
Isn’t there another way to define XYZ? What if I want to have seven different ways of defining coordinates?
I assure you, Blender has got you on this front. Just like the other 21 views, I’m not going to go into that. My goal, believe it or not, is not to drive you insane.
What if you want to move something a very specific amount? You can add a third value:
followed by , or followed by a number, followed by  moves the selection
that many units (by default, meters) in the direction you specify.
moves the selection
that many units (by default, meters) in the direction you specify.
“gx1” moves an object one meter east. “gy-.03” moves an object three centimeters south.
You can move an object. You can move faces. You can move vertices.
Rotating
This rotates whatever you have selected relative to the center of the things you’ve selected.
Can’t you specify what you pivot around?
Yes, just not here.
 followed by This key will start you rotating the current selection. The mouse will
rotate it freely.
followed by This key will start you rotating the current selection. The mouse will
rotate it freely.
followed by , or followed by rotates on only that axis.
“x” is pitch, “z” is yaw, “y” is roll. Or “x” is turning your head down like you do when your “ex” walks into the room. “y” tilts your head to the side, like you do when you ask “why?” and “z” is turning around and heading home to catch some Zs. It took me a long time to remember them.
followed by , or followed by a number, followed by followed by a number will rotate
the selection on that axis by that many degrees. So “rz90” will turn the
object you selected to face east. “rx-90” would set it flat on its back.
Scale
 followed by will make the
selection scale up and down in all dimensions as the mouse moves away or toward
the center of the object you’re scaling.
followed by will make the
selection scale up and down in all dimensions as the mouse moves away or toward
the center of the object you’re scaling.
followed by , or followed by scales only in that one dimension. “sx”
and mouse movements make an object wider or thinner in an east/west
direction. “sz” makes the object taller or shorter.
followed by , or
followed by a number, followed by scales that direction by that multiple.
“sx2” makes a selection twice as wide. “sz0” makes the selection
flat on the vertical plane. This is a little different from “gz0”
or “rz0”, neither of which would do anything.
followed by a number, followed by
followed by a number scales in all dimensions by that number.
Odds and Ends
+ adds a new element. I’ve got to make a confession.
I know this shortcut. Usually, I use “Add” menu at the top of the screen. With lots of these commands, I run them constantly.
There’s a little visual menu for select vertex/edge/face, but I have to do it thirty times in five minutes, so it’s quicker to
type 1, 2, 3. However, I can spend five hours in Blender and only add one or two elements, so I typically use the menu.
 is “fill”. If you select two points and hit “f”, a line
gets drawn between those two points. If you select two lines and
hit “f”, a face gets made between those lines. It’s a lot like
the “e” for “extend” except you have to have multiple elements
selected for it to work.
is “fill”. If you select two points and hit “f”, a line
gets drawn between those two points. If you select two lines and
hit “f”, a face gets made between those lines. It’s a lot like
the “e” for “extend” except you have to have multiple elements
selected for it to work.
+  is “duplicate. It copies whatever is selected.
“shift” + “d” puts you in free movement mode (like hitting “g”),
so I often hit “shift” + “d” followed by
is “duplicate. It copies whatever is selected.
“shift” + “d” puts you in free movement mode (like hitting “g”),
so I often hit “shift” + “d” followed by
What now?
These are the basic things you need to get by in edit mode. I had to have all these down cold before I was comfortable with Blender. I made a bunch of basic furniture along with simple rooms. I made stuff that looks really clunky to me now using methods I now know to be grossly inefficient, but I started to get familiar.
After this, modifiers are probably the best use for your time. There’s a little “Grrr” while you figure out a couple concepts, but then there’s a lot of “Oooh” when it starts to save you a bunch of time automatically generating symmetrical sides or combining objects.
Mostly, keep your scope small. Whether you want to learn 3D printing, animation or sculpture, try to learn just one thing and keep your scope to that one thing until you feel really comfortable with it before moving on.